April 29, 2014

Monogram Chevron Canvas Art

Yeah! My mom lands today and is hopping on a train heading my way right now. Hoping to get into the crafting mode together and sew again. I haven't used my sewing machine in ages I feel like. With all the home decorating my mom has been doing, she did this fun little project for about $5! A nice monogram canvas chevron door sign for her kitchen. Isn't it cute?

Monogram Chevron Canvas Art

To make one, all you need is:
  • Canvas from Hobby Lobby or Michael's
  • Monogram Letter from a Craft Store
  • Paint
  • Cute Fabric
  • Ribbon, or String to hang the sign
  • Glue or Staples 
1. First paint your monogram whatever color you want using acrylic paint.
2. Cut your fabric to fit the canvas, and either staple to the backside of the canvas, or use your hot glue gun.
3. Tie a bow with extra fabric and staple or glue to the top of the canvas.
4. Glue the monogram letter onto your canvas, and voila! Hang it up for all to see :)


Looks just perfect hanging from that rooster, and love that chevron fabric! Might have to make one of these tonight for my house!


April 28, 2014

Home Tour - Yellow and Blue Living Room

Hello everyone! Hope you had a great weekend? I'm sharing today with you a glimpse into my mom's house in Ft. Thomas, Kentucky. She is flying here today and arrives tomorrow! Can't wait!

Once we all left the house for college, she started buying nice furniture and fixing up the house (to include a kitchen and bathroom remodel). This is the second complete redo of the living room, and I love it! Such happy yellow walls! I'll have to ask her where she got the rug and furniture. The lampshades are from IKEA, but that is about all I know. Blues and yellows and green. Lovely. Can't wait to see it in person eventually.

 She still has to replace the curtains, but the room is almost complete!
That piano was my grandmas. It's a super old Steinway. Lots of memories of singing around that piano with family over the years. When my mom's family gets together, and my own, we always sing. Classic old fun songs like "Blue Moon" and "New York, New York" as well as all our musical favorites from classics like Les Mis. Hoping to encourage that with my kids, and plan on doing a bit of that this weekend when I'll have my mom here, her sister Ginger, and my cousin Sarah all in the house at one time! Can't wait!
 Lovin those striped chairs and the cute Spring mantel! The artwork is a Nell Revel Smith painting. She's an awesome impressionist painter from Lake Leelanau, where we have a summer cabin I've talked about here.

Peonies and peeps. Too cute.

So, thanks mom for a tour of your awesome new living room! I love it. Can't wait to see the updates to the den as well, and I'll share here again if you don't mind ;)


April 25, 2014

Friday I'm in Love

Hey everyone! I'm a bit behind on posting the last two weeks. Hoping to find time to craft and blog and breathe again. Honestly, I have no idea where the days go! Time to slow down again and embrace the power of slow.

Easter weekend was beautiful here and so much fun for the kids. I hid their Easter Baskets and made scavenger hunt clues (a tradition from my family childhood), and Frank hid eggs outside while they ate breakfast. It was so much fun seeing them so excited finding the eggs! 

 
 We also found time to climb outside and play at a park with the kids in the sun. So nice to have warm days again and green all around. Everything has budded and is blooming. Love it.

This weekend, we will climb and take the kids to a kinderfest on post I hope. Last year I won a hotel/BMW rental at the event! Hope I'm lucky again. What are your plans this weekend? Anyone gardening yet? I've been told to wait until after May 1st, but I went ahead and bought some flowers this week. Yeah, I'm asking for it .... Living on the wild side!

Here are some fun finds from this week:

April 24, 2014

Living in Germany - Best Place for Imaginative Play

Playmobil Fun Park is by far the coolest place I have ever taken my kids in Germany to play. It is relatively cheap (kids under 3 are free, and only 6 euros for kids under 15), and has more hands on play then any amusement park I have ever visited. Perfect for even toddlers. Sand boxes, parcours split up by age groups, water parks, life size playmobil castles, ships, tree houses, dinasaurs, jungles, farms, arcs, and the longest slides I have ever seen winding around through trees and under nets. 
Lily on the two year old Parcour

King Cooper and Queen Lillian

Bring extra clothes or swim suits for your kids! I came prepared this visit.


I had the pleasure of taking my kids there yesterday. Unfortunately, so did every other German in the country. It is Easter Break in Bavaria right now, and all the kids are out of school this week. I would recommend never going during the German holidays and try to go on a week day. It was insanely crowded. However, we had a grand ol time and stayed for as long as we could before having to head back for a T-ball game.

If you are ever in Germany with kids, this place is a must to visit! It is only 10 minutes outside of Nuremberg. Check the website for more info and directions. You won't be disappointed.

April 21, 2014

Baked Italian Chicken with New Potatoes & Beans

Here is the answer to a busy night meal I found on Pinterest, Loving My Family of Five.  The only change I made was to toss the chicken in a little olive oil & season with pepper before adding it to the pan.  I love it when I can get meat and veggies to cook all at once!  The prep for this recipe took me 15 minutes, mostly washing the potatoes, then 40 minutes to bake.  And it is so healthy!  All you need is some fresh fruit and a loaf of Crusty No-Knead Bread to make it a meal!  Happy Cooking!

1 package boneless, skinless chicken strips (or chicken breast, slice lengthwise)
About 10-15 tiny or small new potatoes
1 quart canned green beans, drained, or fresh equivalent
1 package Good Seasons dry Italian dressing mix
½ to 1 stick butter
Olive oil
Pepper to taste
 
Choose the smallest new potatoes you can find.  It they are tiny it is perfect to leave them whole.  Otherwise, halve the small potatoes or quarter medium size ones.
For green beans, I used a quart of green beans I canned from last year.  It is perfectly fine to use fresh beans but they will take about 10 minutes+ longer to cook.
Wash potatoes and cut if necessary.  Line one long side of a greased 9x13 pan with the potatoes.
String, snap & wash the green beans and line the other long side of the pan with the beans.  So you should have a gap in the middle for the chicken.
In a bowl, toss the chicken strips in a little olive oil, half the Italian seasoning and cracked pepper.  Fill in the middle of you baking pan with the chicken strips.
Sprinkle the remaining Italian seasoning over the green beans and new potatoes.  Pour 1/2 stick melted butter over the entire pan, vegetables and chicken.
Bake in a preheated oven at 350 degrees for 40 minutes.  After 40 minutes, test a bean and a potato.  Continue to cook until vegetables are cooked through.


April 17, 2014

Spring Beautiful, Lenten Roses

Is there anything more seasonally refreshing than the first vivid green shoot poking up through the tired, brown winter soil?  It gives us a feeling of hope & vitality for another year to come.  Spring bulbs, crocus, daffodils, hyacinths, answer this longing.  But there is another, lesser known perennial called Lenten roses (Helleborus orientalis) that also rejuvenate the winter weary soul.

Lenten roses, also known as Hellebores, get their nickname for their growing season.  The green stems first emerge in late winter putting on a colorful riot of drooping bell-shaped blooms usually in early April during Lent.  I planted my first hellebore three years ago and they have proven to be a yearly favorite.
The flowers range from burgundy & pinks to pale yellow-greens.  After flowering, the green foliage stays throughout the summer & fall providing a lush green backdrop for other summer perennials or colorful annuals.  I have found that I get a better, stronger color if I apply a slow-release balanced fertilizer (10-10-10) lightly as they first sprout and then again in the fall.  Lenten roses prefer light shade and well-drained soil.  Their range is Lower to Upper South and into the mountains of West Virginia (U.S.).  Flowers will begin to fade to pastel shades as seeds form.  Once the seeds have dropped, more green shoots will appear.  These can be transplanted and shared with friends in the fall.
I planted three Lenten roses on my cat, Sweetboy, grave 3 years ago.  There are now at least 15 plants there.  I need to divide them but they are so beautiful, clumped and full.  We see them every time we look out the back door.

April 16, 2014

Asparagus Soup


Source for Photo - Simply Recipes
 I thought I would share one of my favorite Easter recipes, asparagus soup.  It is the perfect start to Easter dinner or any meal for that matter, warm and creamy.  But the greenness of the soup lends itself well to spring.  And the fact that asparagus is the best spring crop, hands down, is also a plus.

Asparagus soup

Ingredients:
2 Tablespoons butter
1 medium onion, chopped fine
1 garlic clove, minced
3 cups fresh asparagus, cut in one inch pieces
2 1/4 cups chicken broth
1/4 teaspoon red pepper flakes
3 ounces cream cheese
2 Tablespoon sour cream
small bunch fresh snipped chives

Directions:
In a large saucepan, melt butter.  Add onions & garlic.  Sauté until tender but not brown.

Add asparagus, broth and red pepper flakes.  Bring to a boil then reduce heat and simmer, covered, for 10-15 minutes or until the asparagus is tender.

Pour the soup in the blender a few cups at a time and process until smooth.  ***Use caution when blending hot liquids as the pressure will cause the soup to spew out of the blender and scald you.  The best way to avoid this is to slightly vent the top of the blender and cover the vent with a wet paper towel.  Keep a firm hold on the lid while blending.

Add the cream cheese and sour cream to the last asparagus addition in the blender.

Return to the pot and reheat before serving.  Top each bowl with a few snips of chives and Enjoy!

April 15, 2014

Hand-Painted Easter Egg Ornaments

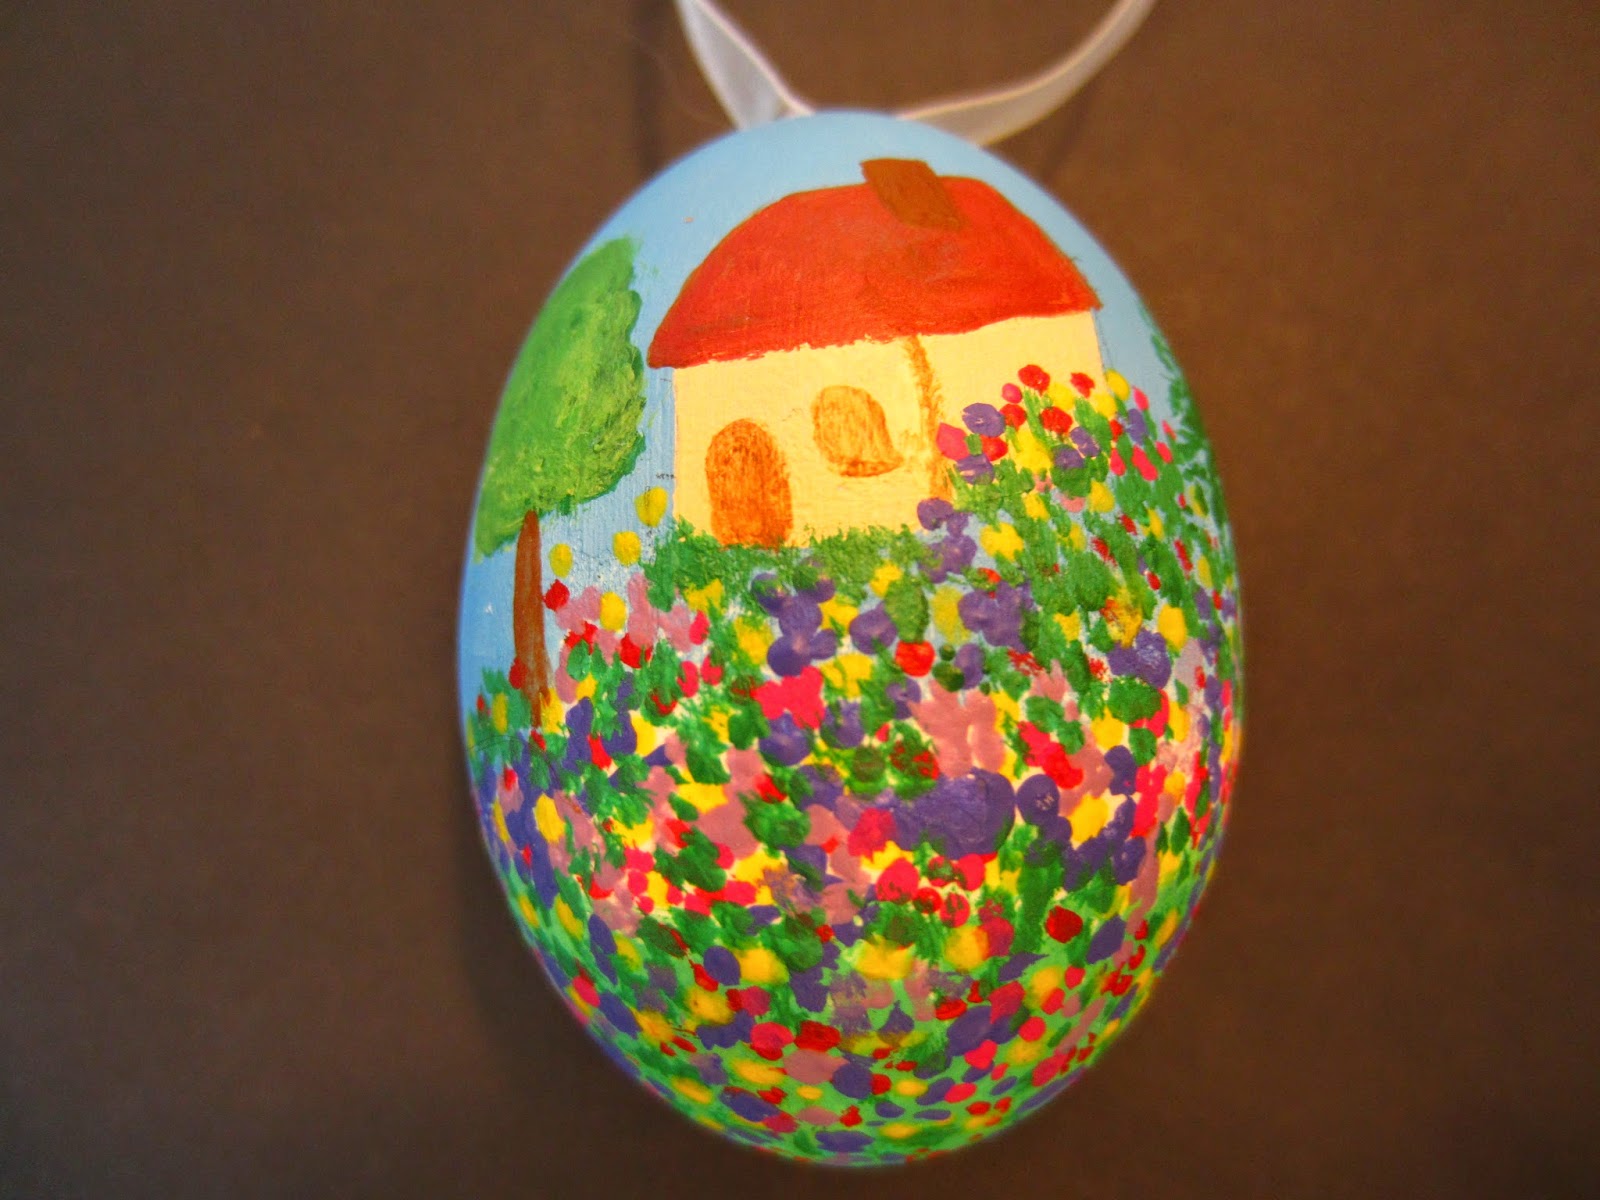
Many years ago a friend from Germany taught me her family tradition of hand-painting Easter egg ornaments.  My first egg was very basic but over the years have added more details to my eggs.  The sky is pretty much the limit with these eggs.  You can be as creative & imaginative or as understated as you desire.  I have several plain but sparkly eggs that were made by coating an egg painted in a single color with Mod Podge and then rolling it in glitter.  I have a 3-D egg that I hot glued tiny rosettes then hand-painted leaves.  For a couple of years I was very creative and based my artwork some of my favorite famous paintings, Van Gogh's Starry Night and Monet's Water Lilies.  I made an egg for each of my kids when they were born with their names and birth dates.  The egg pictured above was inspired by our trip to Riva del Garda, Italy.
DIY Hand-painted Easter Egg Ornaments

1. I like to gently wash my eggs first in mild soapy water to clean the exterior and allow the egg to dry.  If you have clean eggs and clean tools, you can eat the contents of the eggs after blowing them out.  Egg yolks and whites can be safely saved for 2 days in the refrigerator.

2. Next, gently but securely hold the egg in the palm of your hand and poke a small hole in the top & bottom of the egg using a straight pin.  It is helpful if you twist the pin a little rather than forcefully poking it through. Then enlarge the hole with a very small drill bit twisted by hand into the hole
or by slightly 'chipping' away around the hole.

3. Take a paperclip and unfold it.  Poke this into one of the holes and gently scramble the contents so it will come our easier.

4. Now you want to blow out the contents into a clean bowl.  I originally just blew with my mouth over the hole and the contents came out the other end.  I have also tried using an infant bulb syringe places over the top hole to 'blow' air into the egg and the contents out.  Both methods work fine.  It depends on if you are squeamish about eggs or if you have a bulb syringe. 

5. After all the contents are out, I like to run a little warm tap water into the egg, swish it around and blow it out to remove anything that might stink later.
6. Once the egg is completely dry you are ready for painting.  I use basic craft store acrylic paint and a variety of width paint brushes.  You will also need a chopstick for drying the egg.  Before you paint, very gently insert the chopstick into one end of your egg.  Set the chopstick in a tall glass to hold the egg upright during drying.  I keep the chopstick in the egg the entire time to help hold the egg and not smear the paint. 
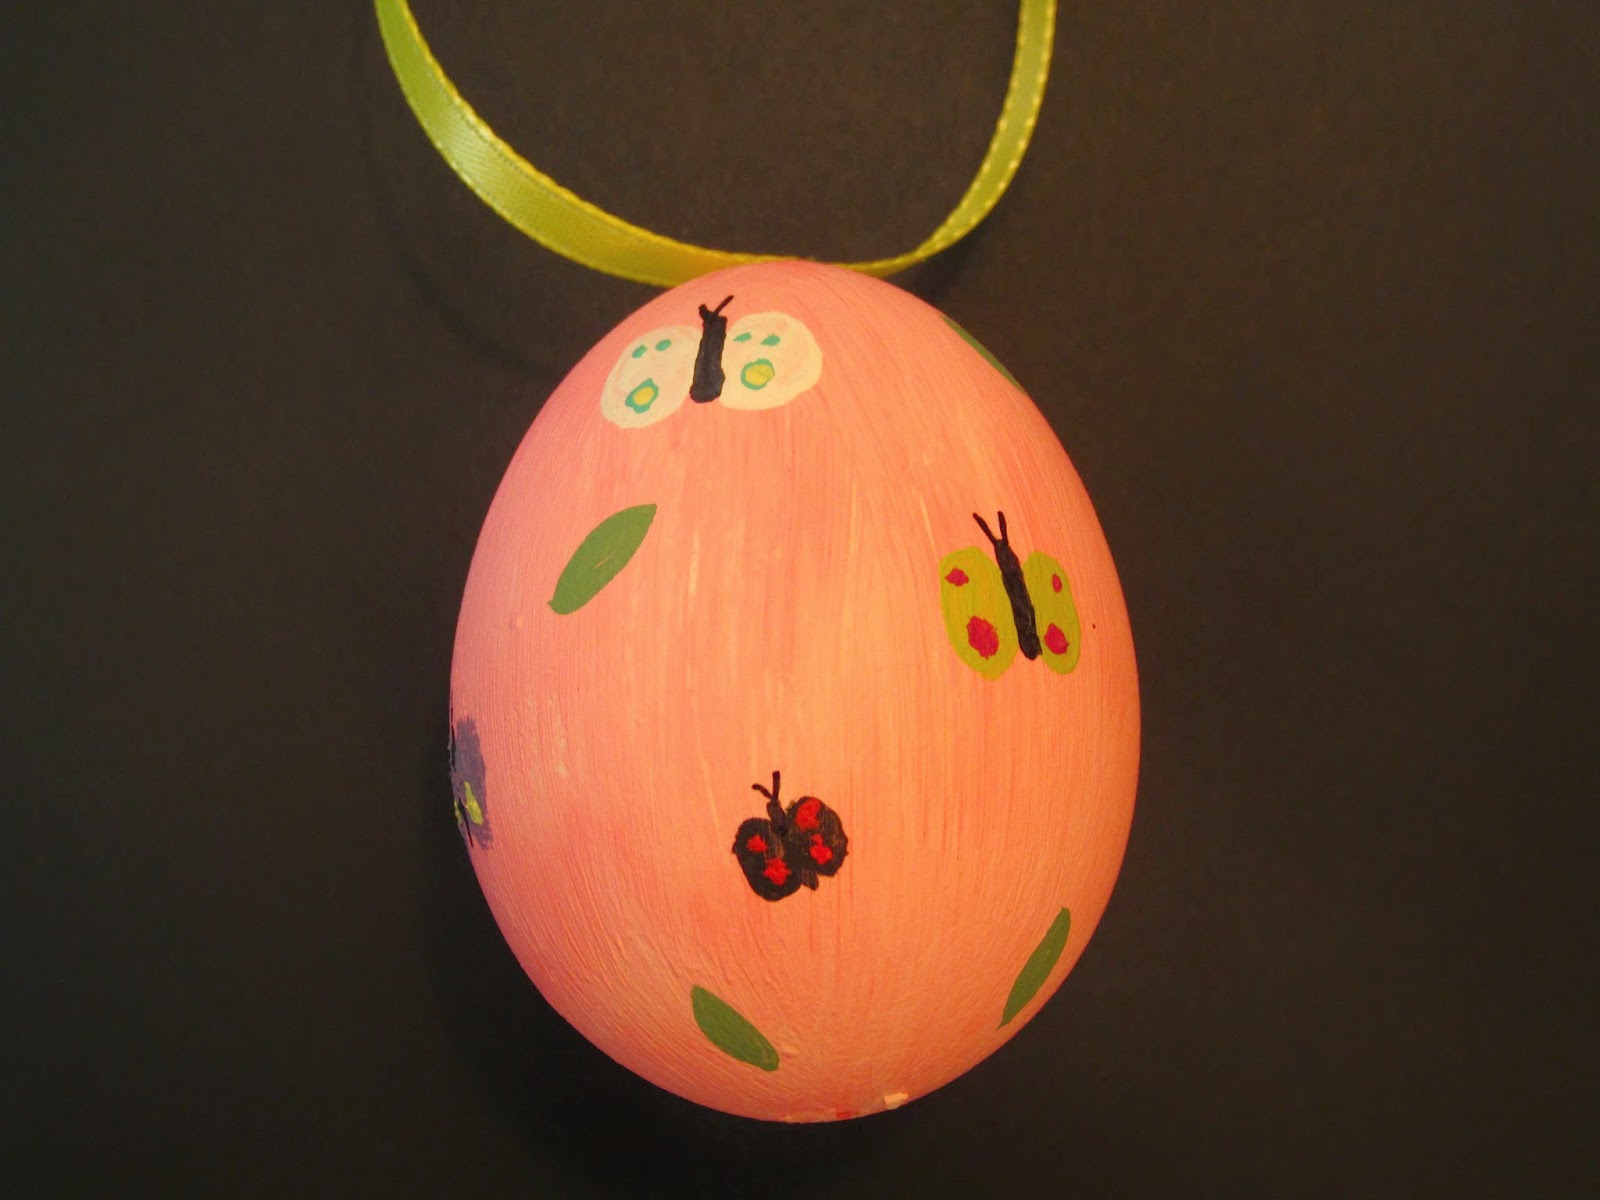
Depending on the picture you are creating, you may need to allow the egg to dry in between colors.  For instance in the egg pictured below, I painted the background, allowed the paint to dry then added the butterflies.
7. After the paint is dry you can add a ribbon at the top for hanging.  I have done this several ways.  You can use hot glue to attach a length of ribbon.  I have added pearl top pins or tiny rosettes over the ribbon, also using hot glue.  This is especially useful if you have a large hole to cover.  Oops!  The last way, is to run a length of thin silk ribbon through the egg with a long needle, knotting it at the top and bottom.


The best way to store the eggs is in an egg carton, Styrofoam or paperboard.  The lids on mine don't close because of the pins on the top of some of my eggs, so I use a rubber band to secure the lid down.  Even with these precautions, I have broken two eggs;  two of my favorites, Starry Night & my daughter's birthday egg.  I haven't gotten around to replacing them yet.  Maybe this is the year!  A friend also gave me an extra large duck egg (it was abandoned) that was beautiful just by itself.  Keep in mind how you will store the extra large eggs if you choose this route.
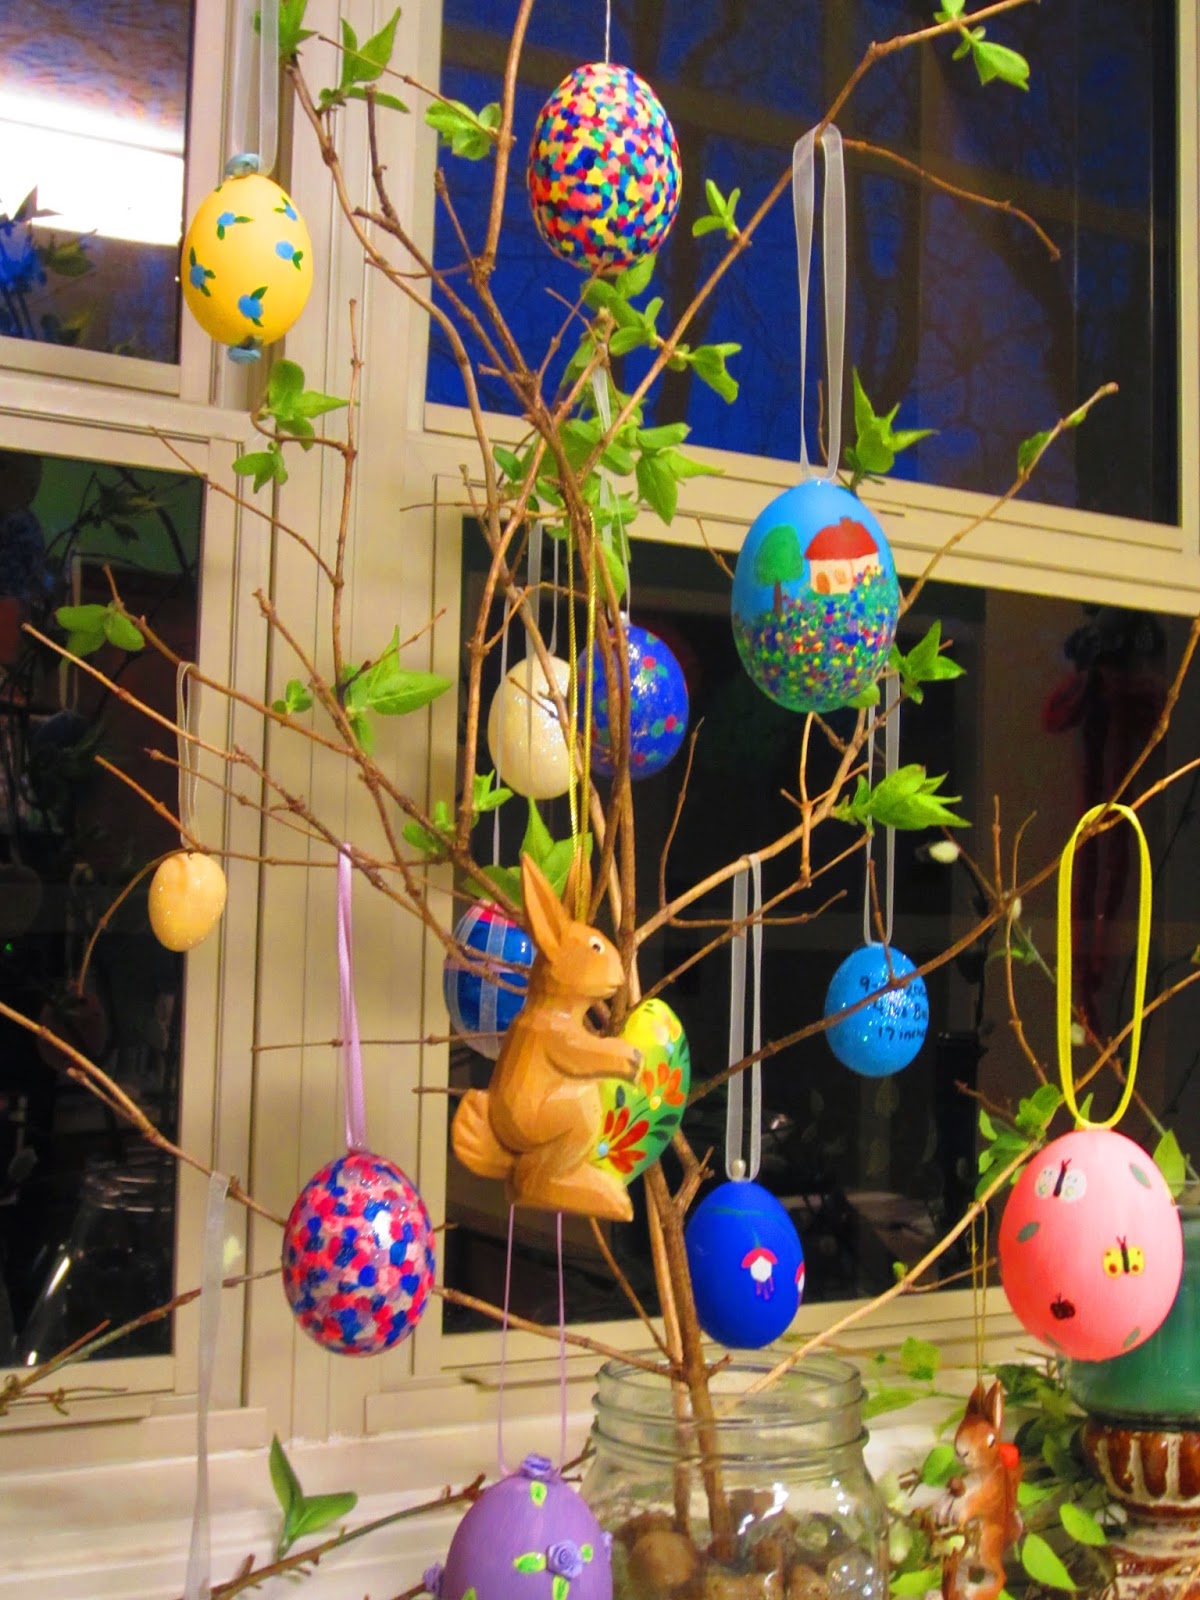
I couldn't resist these adorable hand-carved wooden bunnies from the market in Garmisch, Germany on our last trip.  They make the perfect accent to my Easter Egg tree.  I usually display the eggs on a couple of bare branches that I stick in a mason jar filled with interesting pebbles.  I tie a pretty pastel ribbon around the top of the jar and Voila!


April 14, 2014

Hey friends! I'm back! And boy did I miss these guys a bunch.
 Last week I was in Kaiserslautern for an intense training class that literally covered 400+ slides! Power Point and finical management overload. Though, I did enjoy the trainer and eating out every night was a nice change. I had a few salads I am dying to replicate at home (one with figs, honey, and goat cheese that was out of this world). I'll have to share once I figure out the best dressing.

Saturday, we went to my favorite climbing crag in the whole Frankenjura, called Kuhloh. It is only 25 minutes away in a forest with huge beech trees and awesome, classic, Frankenjura routes. I was mostly happy to just play with my little ones since I hadn't seen them for a whole week! They are so darn cute! Man I love them. Scroll past the pictures from this weekend to see some of my favorite Cooperisms from the last month.

Cooper got a haircut that morning. I always feel a little guilty cutting those curls!
The bubble gun I brought back from K-town was a big hit.


Is she not precious! She learned about 30 new words while I was gone too I think!


So tired and so happy to be with daddy.
 Cooperisms:
"Hey mom, look, scissors! And more scissors over here" - as he pointed to R rated Graffiti in town on a fountain. Hint - part of the male body.

As I read a book about pirates - "Not all pirates are bad though mom, right? I mean, Captain Matt isn't bad is he?" (Captain Matt is a friend of ours over here who is a Solider).

"How did you marry? Did you just find your brother or someone like that to marry? Or did you have to meet the person from somewhere like college?"

 Aren't little ones the best! They put so much laughter into our lives.


April 8, 2014

Spring Mantels

Don't you just love Spring! I know I do. The promise of outdoors, sunshine, fresh flowers, and new life. I always try to "dress" my mantle with things that can remain out longer than a holiday. And I'm trying to add a bit more coral to the blues in my living room. We have tulips in a taurine in the dining room, and daffodils in a hanging vase on the wall. Now we just need to paint our eggs and get the baskets ready!


Here are some other ideas for mantels I really liked and might try next year when shopping without little ones is a bit more feasible.


April 7, 2014

No Knead Cherry Almond Orange Crusty Bread


Hey everyone! Hope everyone had a wonderful weekend. Back to Monday... Don't they come and go so fast? 

Yup. I have another No Knead Crusty bread recipe for you. I am a little addicted to making this style bread. It is incredibly easy, never fails, and so fun to play with the ingredients! I shared the jalapeno cheddar version  last month, now here is another great breakfast bread, with no sugar added! Still haven't tried the whole wheat versions of this bread because I have read so many reviews about how the bread just doesn't rise well and is too dense, but I'll give it a whirl soon.

No Knead Cherry Almond Orange Crusty Bread Recipe
 What you need:
3 Cups Organic White Flour
3/4 teaspoon Active Dry Yeast
3/4 teaspoon salt
1 and 1/2 cups lukewarm water
3/4 cup dried natural cherries
zest from 1 small orange
1/2 cup slivered almonds (I put in 2 handfuls)


Directions:
 1. In a large mixing bowl, mix together all the dry ingredients (including the cherries, almonds and orange zest).
2.  Add the warm water  and mix together with a wooden spoon until it forms a shaggy dough.You don't have to knead the bread, just get it all mixed together and leave it alone. Cover the bowl and let it sit in a warm place 12-24 hours. 
3. When you are ready to cook the bread the next day, preheat your oven to 450F with the dutch oven in the oven as well.
4. Meanwhile, plop your dough onto a floured piece of wax paper, flour up your hands well, and form the dough into a ball shape. Cover with plastic wrap or a towel, and let sit for 30 minutes while the oven preheats. 
5. Carefully take the oven out, place the dough ball into the center of the dutch oven, cover with the lid and put in the oven for 27 minutes covered. After 27 minutes, take the lid off the dutch oven, and let the bread cook in the oven for another 10 minutes to get that nice crusty finish. 
You don't need to oil your Dutch Oven. The bread will come out no problem after cooking.
6. When finished, let the bread cool on a wrack or piece of parchment paper and resist the urge to cut into the loaf for just 10 minutes or so. Slice and enjoy :)


Yummy crusty goodness!
 My kids especially loved this bread for breakfast. You can add a little jam, butter, or it is just as wonderful plain I thought with the sweetness from the cherries and zest from the orange. Thinking a loaf of this bread would make a wonderful gift wrapped in cute fabric...