February 27, 2014

Beans and Pasta Art

Every week, I try to do at least one craft/art project with my kids. It keeps them occupied and happy for an hour, and I enjoy making things with them as well. This project is super easy, and you probably have all the supplies you need in your cupboard right now. We used beans and pasta I had on hand.


 I put a variety of bean and pasta choices in bowls for the kids. Grabbed a piece of cardstock for each, and drew letters for them to fill in however they pleased since we're working on the alphabet with Cooper. He chose to do O. For my two year old, I put the glue in the letter for her, but my five year old was able to do this whole project on his own.


I love the way Lily was working so hard and quietly on this project. She was super at filling in the whole letter all by herself. She loved this craft!

I think next time we'll try a mosaic like this one from Martha Stewart! Aren't those pretty? Canvas vs paper, and more colors. You could make any design you wanted. Can't wait to try this one out myself.


February 26, 2014

Home Tour - Our Living Room

Hello everyone and welcome to a little tour of our house over here in Germany! Our family moved into this house in February 2012, shortly before giving birth to Lily. It is a huge house, bigger than we need, but the only house we could find that winter that was close to our work and would take two dogs! Since we rent the place, we haven't put near as much effort into making it exactly how I want it, but we know we are here only temporarily. However, we have tried hard to make it feel like home.  I'm finally going to start photographing each part of the house. Room by room. I'll start with the living room, and we'll see where we go from there. So come on in!


 When we first moved in, the walls were painted a really crazy green. Like play-doh green. Tropical Thai restaurant green, (see the picture below to see what I mean). We decided we couldn't live with the color, especially in the main part of the house, so we actually paid some painters to paint the dining room and living room, and our room before we moved in. We paid an arm and a leg for the job, but, since I was due any day with Lily, I was happy I didn't have to do the work. When shopping for paint colors, we literally were really limited. They only have one white at our local OBI (like a Home Depot), and maybe two or three choices of other colors, and only one brand of paint! I went with a creamy tannish white that works for us. Helped brighten up the room.
Before
 This is the room that we spend most of our time. Our family plays games on the jute rug (I wish I had 5 of these rugs), watches movies in here, and all our dance parties after dinner are in this room. We even use that window/door as our main door to the house in the warm months. It goes straight to our fenced in back yard/patio.
 The chest in this photo is a family heirloom, and my favorite piece of furniture in the house. Honestly. Passed down from my mom's parents to her, and now to me. And I have damaged it terribly which I just get sick thinking about, and need to get it fixed. You can see the right hinge is missing and some wood along with the hinge was torn off... I used to store games in the chest, and toys, but that was what lead to the damage so I keep it empty now.
 This is the photo we have above our couch. I need something bigger, but still haven't changed anything since we threw up our photos the first month when we moved in. This is one of my all time favorite photos. Frank took it when we were in the Louvre, out a window! The quality is perfect in the real photo, but my picture of the picture is a bit fuzzy. Check out those clouds! It threatened to rain on us all day, but never did.
When we first checked out this house, I was so excited about all the fireplaces! I love fireplaces. But, turns out, this one is completely fake. A facade that my son likes to climb up into to hide. So disappointing.  But, it is fun to decorate during the holidays. Right now it is a bit sparse because Cooper likes to climb up on the shelf and jump to the chaise, so I have removed all breakables...

 And there you have it! A glimpse into our home over here in Germany. More tours to come!

February 25, 2014

7/52

"Green Eyes, you're the one that I wanted to find...."
Look at those loving eyes. Cooper being sweet on his little sister's birthday. 
Although I haven't posted every week, I've been keeping up with taking portraits of my kids every week as part of my New Years Resolution. Last week was my little one's second birthday, and her loving brother doted on her well that day.

By Gone Valentines

Every year after Valentines, I am at a loss as to what to do with all the Valentines my kids accumulate.  Aidan & Ashley always want to keep every single one.  And in fact they do go back year to year and peruse their past Valentines, laughing & comparing.  Last year I had a brainstorm, make a Valentines Hollywood Box.  To back up just a little, a Hollywood Box is a term my mother-in-law, Penny, used & something she loved to make.  She loved gift wrapping in general.  We would always feel really special if we received a gift in a Hollywood Box!!!   

It is pretty simple, a birthday or Christmas present that comes in a wrapped box like in the movies, hence the name Hollywood.  The actress would just lift off the top of the box and immediately see the contents.  The top and bottom of the box where wrapped separately.  It's not hard but does require a little time & patience.  So, I took this concept and used it for Valentines.


It is a pretty simple process.  I found two old shoeboxes.  Cut a slit in the top of the box for the Valentines to slip through.  Then wrapped the box with the top open.  The tricky part in this one case is that I chose shoeboxes that had flap lids so that they would open & close like a treasure box.  Also, the tops would stay on during yearly storage.  I wrapped both boxes in plain red wrapping paper and let the kids decorate them with stickers.  You can be as creative with these as you want; stenciling, fancy scrapbooking paper, 3-D beads & buttons, ribbons, etc.  I really like the button idea myself.  But keep in mind that over the years these boxes do get a bit of kid-wear.  Most of the google eyes on our heart stickers are coming off. 

As far as the actual wrapping process for a flap-top shoebox, I measure the wrapping paper with the box closed and then cut extra on all sides.  I used double-sided tape to adhere the paper to the outside of the box and then cut enough extra paper to wrap it to the inside of the box and secure with regular tape.  Trim off any excess but leave enough paper inside the box to hold.  The double-sided tape isn't absolutely necessary but it does help the paper to stay put while you are trying to flap in the sides.  I fold the paper around the edges like you do went wrapping any gift box.  Good creases help.  Lastly, I carefully cut an X in the paper over the slot in the top with a knife, flapped that paper in and secured really well with tape. 


This year there was an added bonus.  Aidan's teacher wanted the students to decorate a box at home to bring in to school on Valentines.  So Viola, I removed the past Valentines, sent in his empty box and home he came with the box full.  During the year these boxes store easily in the top of their closets.  **One word to the wise, if someone is unfamiliar with a Hollywood Box, you may want to advise them of it before they start ripping the paper off and your hard work is gone.

Happy Crafting!


February 21, 2014

Friday I'm in Love

Another weekend! So nice to have a short week every once in a while. Today, I am dreaming about vacations I want to take this year. We're planning a trip home to Kentucky for certain, but we're also trying to pick between Greece or Turkey perhaps this year for our climbing trip. Just looking at pictures and flights is lifting my mood! Have you all seen this article about how vacations affect your happiness?  I know this is old stuff, but still think it is amazing that the actual act of planning a trip makes you happier than the trip itself! Too funny. We all should be vacation/wedding/party planners. That way we'd always be super happy because we'd always be planning happy things!

I'm also having fun looking through old trip photos, trying to decide what the next place I should post about for the Amazing Places series I post about from time to time. I've received a few e-mails from people asking about Fontainebleau, Prague, and Garmisch. The bike photo above is from Belgium, in a lovely teeny tiny town (the tiniest city in the world) called Durbuy. We were walking along the river under a bridge and there we found this rusty old bike turned into a planter. Isn't Europe just so lovely like that? Charming and romantic in such unlikely places. I turned the photo into an impresionist painting using ribbet. The original photo is actually below. So anyhow... if you readers out there have any places you'd like some information about such as photos, places to eat etc in Europe, let me know in the comments and I'll write up a bit if we've been there.


As always, here are some links from around the web I thought I'd share:

  • The pictures of this  flour-less chocolate cake have me drooling.
  • So inspired by this blogging team.
  • I need to try this with my hair sometime or this one.  Definetly in a rut right now and need to get my hair highlighted or cut or something! I am done with the bangs. Totally done with them and growing them out is proving to be quite a pain. 

February 20, 2014

The Best Chicken Tikka Masala Recipe

Yesterday was my baby girl's birthday! She is two!! We celebrated at home, she in her tutu from my mom and butterfly wings.  I baked a pound cake with homemade whipped cream and berries on top. Yum. She knew just what to do this year with her candles and sang Happy Birthday with us. She blew them out and grabbed them to lick them right away. So cute.

As I mentioned Friday, for Valentine's Day we had my favorite dinner, chicken tikka masala. I once found a recipe on food.com, but over the years, I have changed/altered the recipe enough that I have my own version. I always make homemade naan that I cook in a skillet to go with the meal, and basmati rice. We also always try to have something green at the table each night, so I quickly added edamame and peppers. Not exactly Indian, but hey, they were green.

The only time consuming part is the naan really, and the marinade. I used to buy a Tandori Chicken spice that I'd use to make the marinade instead, but the stores here don't sell it, so I have been back to using the original marinade recipe I found years ago.

I'll have to learn to take pretty food pictures! This was with my iPhone, at night, on my scratched up IKEA cheap plates. But, you get the idea. Just imagine the creamy goodness. And if you haven't' ever had chicken tikka masala, you have NO idea what you are missing! Get yourself to an Indian restaurant this week to try it out or follow this recipe! I promise you will love it.


February 14, 2014

Friday I'm in Love

Happy Valentines Day!


Any romantic plans everyone? We don't do too much for this holiday, but we always like to fix our favorite meal and a good dessert and sit down for a movie together on Valentines. That's the date plan for tonight at least. On the menu? Chicken Tikka Masala. I'll have to share the recipe soon. With homemade Naan. Yum. I love Indian food. As for a movie, I want to rent "About Time", but we'll see if Frank can be persuaded. Anyone have some good recommendations? We are a bit behind the times over here with movies/TV shows. The last one I went to see at a theater was "Hunger Games" (the first one), and we don't have cable TV, so we just rent movies here and there from Amazon or iTunes.

Anyhow, also wanted to give a shout out to Julie McDaniel, my sister in law who is now going to help contribute articles to the blog! She shared a cake she made yesterday that looks fantastic! Thanks Julie and I am looking forward to your posts!

As always, some interesting web finds:
Enjoy your weekend everyone! 

February 13, 2014

Yummy Valentines!

Yummy Valentines!


So here is my first attempt at blogging.  Thank you for giving me the opportunity Mandy, sweetest sister-in-law ever!  I have been inspired to move away from packaged foods and create our meals more from scratch.  So we are not exactly on the whole food lifestyle, but moving closer to it everyday.  This recipe, while it is from scratch, probably doesn't fall anywhere close to 'healthy' food.  But, everyone needs to splurge a little & what better time than Valentines.

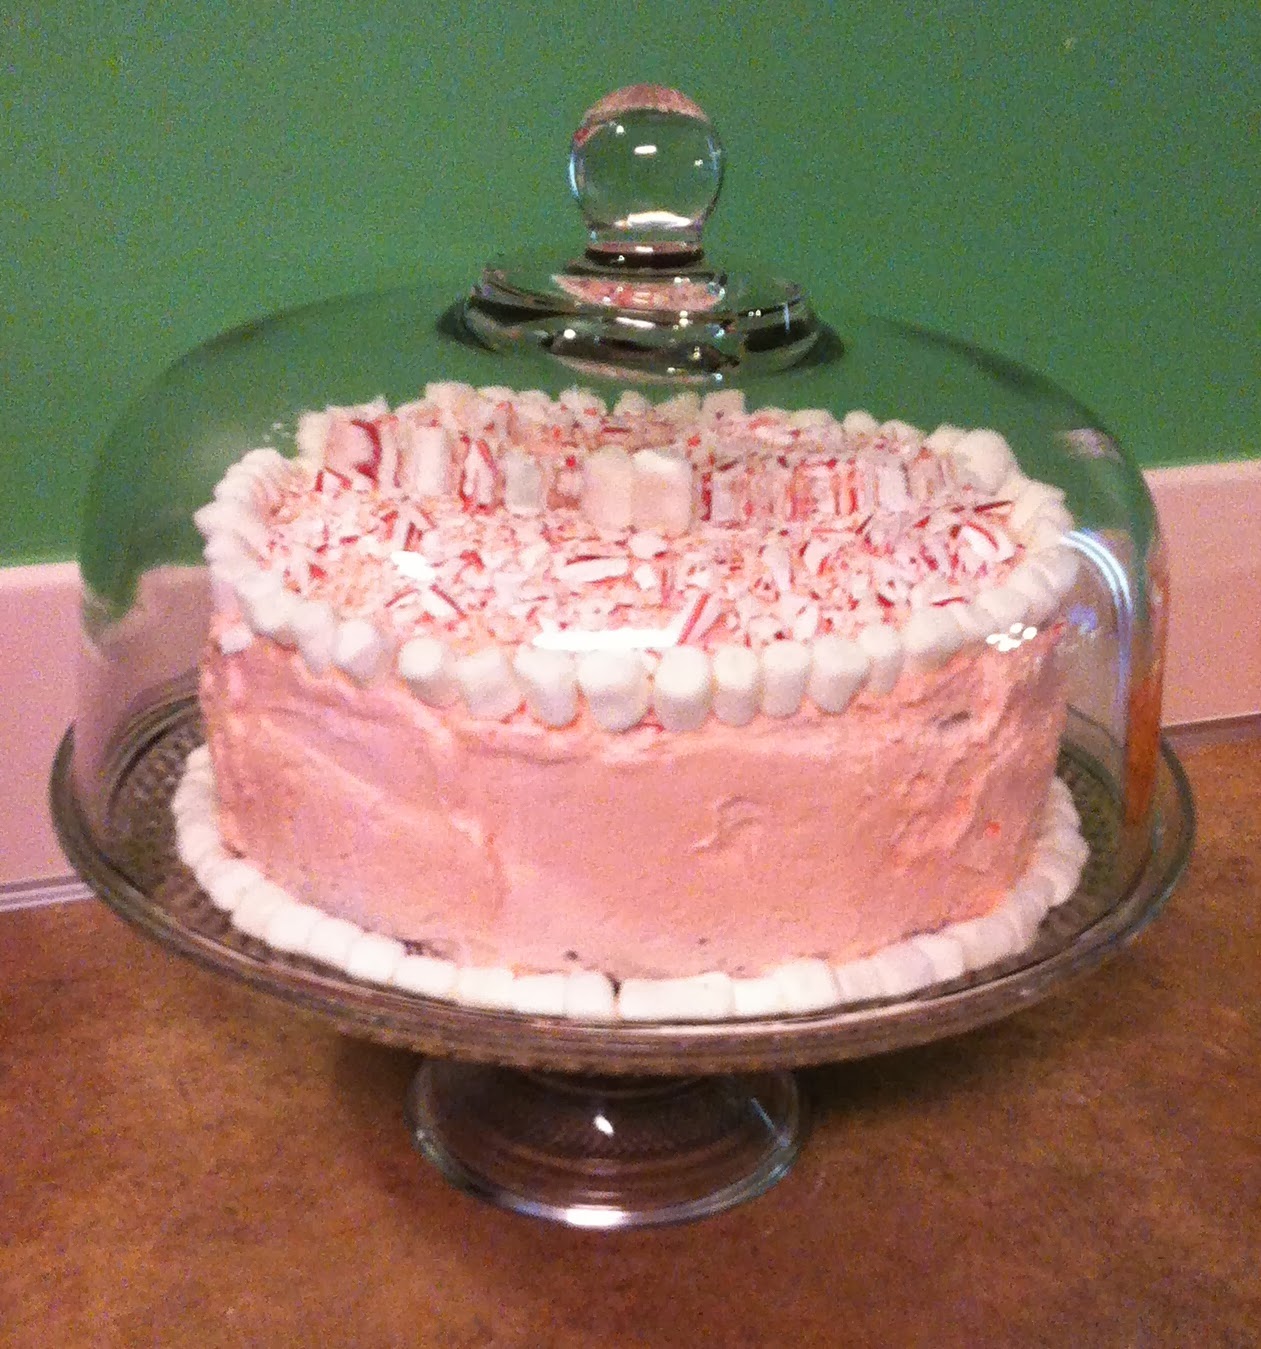
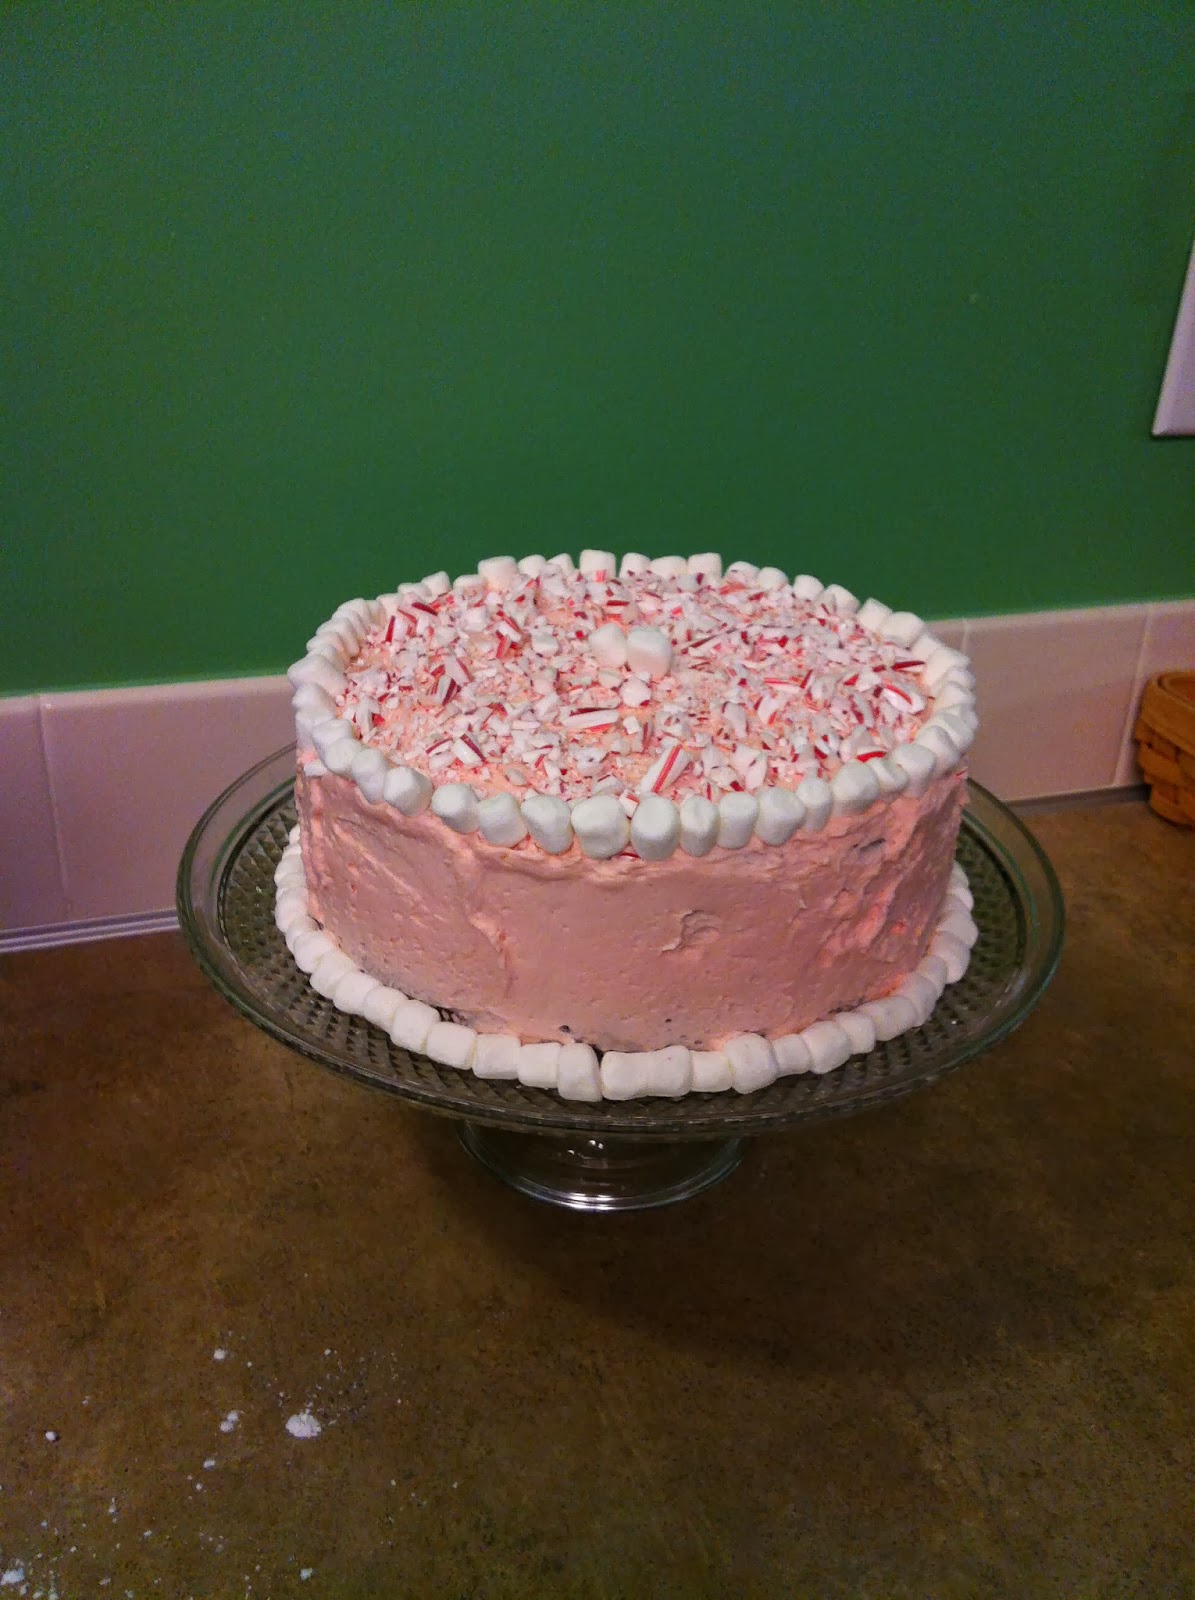
My seven-year old daughter requested a "peppermint cake because it's pink" for Valentines.  This recipe for Candy Cane Cake is a close match.  And since the cake part is chocolate, I went with it.  To be honest, this is one of the best chocolate cakes I have ever eaten!  So anytime of the year would be perfect and you could just switch up the icing to suit your taste.


 Candy Cane Chocolate Cake

(from The Vanilla Bean Blog)


The cake was not super hard nor time consuming.  But whenever I am working with my kids I try to have the ingredients and all the tools necessary ready to go.  I've found through many trial & errors that having everything on hand prevents too much unnecessary ingredients going into whatever I'm cooking....like ice, cat food or way too much sugar (Ashley's favorite). 


Ingredients for the cake:

1 3/4 cup flour
2 cups sugar
3/4 cup cocoa powder
2 teaspoon baking soda
1 teaspoon baking powder
1 teaspoon salt
1 cup buttermilk, shaken
1/2 cup vegetable oil
2 eggs, at room temperature
1 teaspoon vanilla
1 cup freshly brewed hot coffee

Preheat the oven to 350 degrees.  Butter two round 8 inch cake pans.  Line the pans with parchment, then butter and flour the pans.  Make sure to get all the edges and creases well buttered. 

Sift the flour, sugar, cocoa, baking soda, baking powder and salt into mixer bowl.  Mix on low speed to combine.  In another bowl, combine the buttermilk, oil, eggs and vanilla.  With the mixer on low, slowly add the wet ingredients to the dry.  With the mixer still on low, add the coffee and stir just until combined, scraping the bottom of the bowl with a rubber spatula if necessary.  **The batter will be very liquidy at this point, but do not worry.  Pour the batter into the prepared pans and bake for 35-40 minutes or until a cake tester comes out clean.  Cool cakes in the pans for 30 minutes then turn them onto a cooling rack and cool completely, removing the parchment paper.

Place the first cake, flat side up, on a plate.  With a spatula, frost the top of the cake.  Place the second layer on top, rounded side up, and spread the frosting evenly on the top & sides of the cake.  I used a kitchen mallet to crush up candy canes left over from Christmas in a Ziploc bag.  Ashley chose to put the marshmallows around the edges for a cute touch instead of piping the frosting.

Ingredients for peppermint frosting:

3 sticks unsalted butter, cut into chunks and softened
3 Tablespoons heavy cream
2 1/2 teaspoons vanilla
1 teaspoon peppermint extract, or less, taste as you add
1/4 teaspoon salt
pink food coloring, optional
3 cups powdered sugar
4-6 candy canes, crushed

Beat the butter, cream, vanilla, salt and food coloring together on medium speed until smooth, 1-2 minutes.  Reduce the mixer speed to medium-low, slowly add the powered sugar and beat until smooth for 4-6 minutes.  Increase the speed to medium-high and beat until the frosting is light & fluffy, about 5-10 minutes.


Here is the link the delicious Vanilla Bean blog where I originally found the cake recipe. http://thevanillabeanblog.com/2011/12/candy-cane-cake.html  She has some wonderful pictures and other yummy looking desert that are on my list to try!

Enjoy!

Almost Two


My baby girl is turning two in just a week. I can't stand it. Them growing up this fast. Where do all the days go? So thankful for digital cameras for capturing our days that disappear faster than I can catch my breath.

A letter to my little one to remember her the way she is right now forever.

Dear Lily,

Sweetest baby girl. You run and climb and try to be so big, demanding a real seat at the table and no more high chair. Yet, you won't let go of your bottle once you see it and still latch to all things soft and cuddly. You run with excitement over every little thing, and almost every time, your excited little feet can't keep up with you and you crash over a rug edge or door edge or something on the floor. But you hop back up and keep on going. Bubbles, drawing, going to the park, heading up for bath, daddy coming home, Cooper coming in the room, all things you do a happy dance for.

My favorite thing right now is how you talk. You are saying so much now and in the cutest little voice. "I yuv you" as you hug us and pat our back or touch my cheeks. Oh, and the way you sing! You sing and dance at the same time and I just want to squeeze you up! A B C G B C A  as you bounce up and down bending your knees, twisting at the waist for each letter. And if I join in, I get that cross look from you and you stop, waiting for me to quit singing. Ha!

When you see your tutu you instantly have to put them on, along with your Bzzzzz bzzzzz (butterfly wings). You could spend the whole day in that outfit if I'd let you. And your swimsuit. You like to pull it on over your clothes and rub it up and down feeling the smoothness as you prance around.

I can't sit next to you on the couch, you insist on sitting in my lap when we watch a movie with Cooper, or read a book, and always need your "inkie" (blankie). You kiss all the animals in your books, and now the pages stick and have torn and you kiss the "owies" (tears) that your kisses have created.

You can climb out of everything and up anything now, but you are so good and listen to us and always try to please, so you still stay in your crib even when you wake up, talking to yourself gently while you wait for us to come. You help me do everything you can! You recycle while I cook, throw away any garbage you can, feed Maya, clean any spills right away, and love to clean up! Yes, you are the sweetest child my dear Lily. I yuv you so so dearly, my precious girl.

Love

Mommy

February 11, 2014

Content

“The greater part of our happiness or misery depends upon our dispositions, and not upon our circumstances.” Martha Washington
 The other night, when the kids were in bed and Frank and I had a chance to catch up and talk, we discussed being content. The definition for content ranges from "in a state of peaceful happiness" to "pleased and satisfied, not needing more". And the roots of the word come from the Latin word contentus, from past participle of continēre to hold in or contain.

I like thinking about the root of the word. I imagine myself a container, ready to hold onto happiness and good moments.

Some moments, I feel like I really have that peaceful happiness, that feeling so pleased and satisfied that I could never need or want or ask for anything more. I wish I could hold onto that contentment, my contained happiness, throughout the day every.single.day. I'm practicing. Learning to recognize the moments and how to frame my mind to be more content daily.
  
 “I have learned that to be with those I like is enough” Walt Whitman

Sunday morning was one of those content mornings, and I told myself to capture it so I could hold on to it a little bit longer. Kids and bubbles. Bubbles and kids. Even on a chilly morning, they were content to blow and chase bubbles for almost an hour. For that hour, I wanted nothing else but to see them laughing, playing, and running around so happy giggling over bubbles. Content.


February 10, 2014

Knights and Dragons Birthday Party

Last year, it was Angry Birds. This year, for his 5th birthday, Cooper wanted Knights and Dragons for his theme, and what a fun party that made!

We made the invitations together. I made them in Ribbet because of all the fun fonts you choose, and then printed on normal paper. Cooper and I cut them out, and pasted them onto card-stock, stained them with tea, and burned the edges with a candle together (a trick I learned in 5th grade while making replicas of the Magna Carta).


When the kids came, they could make their own homemade pizzas and decorate their own shields while waiting for the others to arrive.


I made the shields from cake plates vs cutting out cardboard (thanks for the idea from Chicken Babies) , spray painted them silver,  and free handed some various crests onto each for them to color in with glitter markers. We used duct tape for handles on the back.


I also made tunics for each of the kids, with crests that matched the shields using felt I picked up at the craft store. For the crests I cut out, I used "heat n bond" to iron them on to each felt tunic.

Once all the kids arrived and made their pizzas, I had them put on their tunics, grab their shields, and get ready for a knight tournament (used game ideas from pinterest and chicken babies) Each kid had to jump over a moat (a blue sheet), that I made bigger and bigger until none of them could make the jump.
We then threw fire bombs (soft kid balls) at the kids as they ran from one side of the room to the other, and they had to block them with their shields.
After that, I made them each balloon swords, and they had to storm the castle (run up our stairs) and attack dragons (balloons) that were hanging from the walls. Unfortunately, I didn't get pictures of the last two events since I was throwing balls and making swords.

After the tournament games, we ate pizza, fruit, and then it was time for the cake. I found the cake idea on  spoonful and use a simple white cake recipe vs the elaborate yellow cake recipe I used for his real birthday out of Joy of Cooking. I wanted to use swords for the fruit, but couldn't find them here in Germany, so I used skewers instead.


After cake, it was time to destroy the evil dragon that was attacking the castle (pinata). I gave each of the kids a real plastic sword (instead of the balloon swords from earlier) that they could hit the pinata with. Each kid must have taken 15 turns and that pinata would not break! We had to bust out a wooden stick and let Frank bash it open.

 Cooper then opened his presents and gave each of the kids their goodie bags. In each bag we put bubbles and a big bath bomb (dragon's egg) they can use in their bath that we made using our Lush Bath Bomb Tutorial. Plus, they had their new shield, sword, and tunic to bring home as well as some candy from the pinata.


I think this knight was pretty darn happy.